Sunday, October 9, 2011

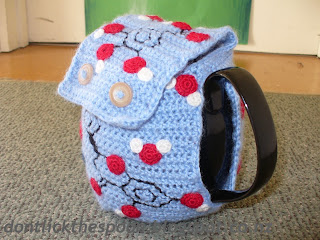
Molecular Tea Cosy

About six months ago (maybe more, this year has gone so fast!), I came up with the idea of making a tea cosy embroidered with some of the molecules in tea.  After a few stops and starts and side projects (laptop sleeve, hats that look like strawberries, assorted cute thinks like robots, zebras and german shepherds, a sweater that I'm never going to finish...), I've finally finished it!


I can't remember what the stitch the tea cosy is worked in is called.  It's some sort of variation on double crochet that gives a nice slant that helps with the embroidering of the hexagons.  It's surprisingly difficult to get a proper run down of the molecules in tea, but after some digging I found (and have since lost) a couple of documents that had some structures.  I was quite limited in what I could use because due to size constraints, but I managed to fit a representative range.  The molecules are:

 Gallic acid on the top flap (top photo)


Hesperetin (a flavanone)


Caffeine (awesome)


Quercetin (also a flavanone)


Theanine (an amino acid)


There are also a number of water molecules in prime hydrogen bonding positions (yes, I'm a nerd).

Wednesday, September 7, 2011

GF Lemon And White Chocolate Cookies


150 g softened butter
1/4 cup brown sugar
1/3 cup caster sugar
1 egg yolk
1 tsp vanilla essence
1 1/2 cups flour (2 parts rice, 1 part corn, 1 part tapioca plus 1 tsp guar gum)
1 1/2 tsp baking powder
~100 g white chocolate, chopped into chunks
rind and juice of 1 lemon


  • Mix butter, sugar and egg together until smooth
  • Add vanilla and mix through
  • Add flours and baking paper, mix until combined
  • Stir in chocolate and lemon rind and juice 
  • Roll in to balls and place on a tray lined with baking paper
  • Bake 10-15 min at 180°C until lightly browned

Variations:  To make a lactose-free version, use dark chocolate and margarine.  
The recipe works with just rice flour - use only 1 tsp baking powder, and add about a tablespoon of water

This is a very versatile recipe, so play around with different types of chocolate, with or without lemon.  I particularly like using a mix of white and milk chocolates, with no lemon.

Sunday, September 4, 2011

Super Lemony Gluten- and Lactose-Free Lemon Meringue Pie

Pastry

125 g chilled margarine, cubed
250 g gf flour (I use 2 parts rice, 1 part corn and 1 part tapioca)
1 tsp guar/xanthan gum
2 Tsp caster sugar
1/2 tsp salt
1 egg yolk (keep white for meringue)
2 1/2 Tsp cold water

  • Sift flour, sugar and salt together 3-4 times to make soft and fluffy
  • Add cubed margarine and rub into the flour, lifting as you rub to ensure there is lots of air
  • Whisk egg yolk and water together
  • Make a well in the centre and pour in egg
  • Mix through by 'cutting' rather than stirring (or use dough beaters)
  • Form the dough into a ball and chill in the fridge for 30 min
  • Once chilled, roll out or press into a 23 cm tin
  • Blind bake for 15 min at 180°C, then bake for another 15-20 min
  • Allow to cool to room temp

Lemon Filling

3-4 large lemons
100 g margarine
1 cups sugar
2 eggs, beaten

  • Grate lemon rind and squeeze juice into a saucepan
  • Add eggs, sugar and cubed butter
  • Stir constantly with a whisk over a low heat until sugar has dissolved
  • Chill for ~an hour in freezer, or overnight in fridge

Meringue

4 egg whites
1/2 cup caster sugar
1/4 tsp salt

  • Beat egg whites and salt together
  • Slowly add sugar while beating
  • Continue beating until stiff

Putting Together

  • Mix 2 Tsp meringue through the lemon filling
  • Pour lemon filling into cooled pastry shell
  • Spread meringue evenly over the top
  • Bake ~15 min until the meringue top is light brown

Sunday, May 1, 2011

Turtle Tea Cosy


Tea Cosy


The base tea cosy is worked in star stitch:

Beginning star
ch 3, draw up loops through 2nd ch, 1st ch, dc from previous round and centre of last star (5 loops on hook).  YO and draw through all 5 loops.

Star Stitch
Draw up loops through centre of previous star, the same stitch as the last loop of previous star, the top of the star from the previous round and the centre of the star from the previous round (5 loops on hook).  YO and draw through all 5 loops. (There are several tutorials on how to work star stitch available if you google it)


r1  Foundation sc in multiples of 2 + 1 until length is about 1/3 longer than the width of one side of the tea pot at the widest part (About half way up, between the the points where the spout and the handle start).  The fabric won't settle into the proper size until about 3 rows of star stitch have been worked.  It might take a bit of trial and error to make sure the piece is the right size.

r2  ch3, draw up loops through 2nd ch, 1st ch, sc at base of chain, next two sc (5 loops on hook).  YO, draw through all 5 loops.  *draw up loops through centre of last star, the sc of the final loop of the previous star, next two sc (5 loops on hook).  YO and draw through all 5 loops.*  Repeat between * * til the end of the round.  Dc in final sc.

r3  Beginning star, then star stitch until the end of the round.  Dc in the top of the last star of the previous round.

Repeat r3 until the piece reaches the top of the spout.  Fasten off.

Make a second piece of the same size, but instead of fasting off, do another row and continue the row over the top of the first piece (make sure the stitching is going the right way!).  I joined the two by making a star stitch with a couple of extra loops over the two dc at the ends of the pieces.

Continue repeating r3 until the piece reaches the top of the handle.  Join the two ends together with a sl st.  You can either continue making a dc at the end of each row, or change the dc to another star stitch.

Continue working the star stitch rows in a round until the tea pot begins to get smaller at the top.  Measure the height of the remaining tea pot, and measure how many rows this height equates to.  Divide the number of rows into the number of stitches.  This is the number of stitches you need to decrease in each row (e.g., if there are 6 rows and 36 stitches, you'll need to decrease by 6 stitches each row).  The way I work a dec in star stitch is, instead of drawing up the 4th loop through the top of the star stitch from the previous round, draw it through the centre of that star then draw the final loop through the centre of the next star.

Space the dec evenly throughout the the row (i.e., for 6 dec in 36 stitches, dec every 5th stitch).   When there are only a handful of stitches remaining, fasten off.  You can either sew the hole closed, or leave the hole open and pop the top of the lid through it (see the above pictures).

Sew the bottom together at the sides, sewing up to the base of the handle and spout respectively.


Turtles


Head

r1  ch2, sc in 1st ch, draw up a loop through 1st ch, ch1 in first loop on hook, yo and draw through both loops
r2  ch1, 2 sc
r3  ch1, 2 sc
r4  inc x 2
r5  ch1, 4 sc
r6  ch1, 4 sc
r7  ch1, dec x 2
r8  dec, fasten off and tuck in thread


Flippers (make 4)

r1  ch2, sc in 1st ch, draw up a loop through 1st ch, ch1 in first loop on hook, yo and draw through both loops
r2  ch1, 2 sc
r3  ch1, 2 sc
r4  ch1, 2 sc.  Fasten off and tuck in beginning thread


Tail

r1  ch2, sc in first chain
r2  ch1, sc
r3  ch1, sc
r4  ch1, sc.  Fasten off and tuck in beginning thread


Shell (Make 7)

r1  6sc in magic circle
r2  2sc in each stitch.  sl st in 1st st.  Clean fasten off (Cut thread, pull loop through last st, thread the end through the next st around (2nd st).  Thread the end back through the last st of round.)


Putting it Together

Sew 6 of the shell pieces around the 7th by sewing 3sc of each piece into 3sc of the central piece (the 3rd sc will need to be shared with the next piece).  Sew the 6 pieces together by 5 adjoining sc.  Sc around the base of the shell (there should be 2sc left from each shell piece, plus do a sc in the last sc that makes up the join between adjacent shells (4 sc per shell)).  Attach the other pieces to the shell by sewing one per shell piece in this order:  Head, two flippers, tail, the other two flippers.

Attach the turtles to the tea cosy by first sewing on the shell (add a little bit of stuffing to hold the shape), then sewing around each of the limbs.

Friday, April 8, 2011

Dr Oodberg!

Ever since I started crocheting the Goth Vampires, my boyfriend kept on bugging me to make him a crochet Zoidberg.  After putting it off for a while, I decided to make one for him for Valentine's Day.  It took a bit of scheming, as I had to make it in secret, and a fair bit of trial and error to get the tentacles right (I used a mix of patterns from Creepy Cute Crochet), but I was reasonably happy with how he turned out.  However, I only had black eyes, so he ended up looking a bit like an Ood from Doctor Who.  Not that that's a bad thing (I might actually make an Ood properly one day...).  So here's Dr Oodberg!

Textured Crochet Hat

Awhile ago I made some fingerless gloves from Crafty Beaver's pattern, and wanted to make a hat to match.  After spending hours trying to find a pattern that I liked, I decided to frankenstein one up from a few different patterns, plus a bit of random adaptation, and this was the result.  I made the same hat in black for a friend who wears it with crochet flower badges that match her outfits.


Textured Crochet Hat


Pattern uses:
4 mm crochet hook
~ 50 g 8 ply wool

r1         ch2, 91 foundation sc, join with a sl st
r2         ch1, turn.  *Skip first (next) sc, (sc, dc) in next*.  Repeat * * around (45 clusters)
r3-r25   ch1, turn.  (sc, dc) in each dc around.
r26       ch1, turn.  *(sc, dc) in next 4 dc.  Skip next sc, sc in dc, skip next sc, dc in dc*.  Repeat * * around (8 times).  (36 clusters)
r27       ch1, turn.  (sc, dc) in each dc around.
r28       ch1, turn.  *(sc, dc) in next 3 dc.  Skip next sc, sc in dc, skip next sc, dc in dc*.  Repeat * * around.  (27 clusters)
r29       Repeat r27
r30       ch1, turn.  *(sc, dc) in next 2 dc.  Skip next sc, sc in dc, skip next sc, dc in dc*.  Repeat * * around.  (18 clusters)
r31       Repeat r27
r32       ch1, turn.  *(sc, dc) in next dc.  Skip next sc, sc in dc, skip next sc, dc in dc*.  Repeat * * around.  (9 clusters)
r33       Repeat r27
r34       ch1, turn.  *Skip next sc, sc in dc, skip next sc, dc in dc*.  Repeat * * around.  (4.5 clusters)

Tie off, leaving a longish tail.  Use tail to sew closed the hole.


This hat is a snug fit on my large (59 cm) head.  The pattern can be adapted by using fewer stitches (Start with multiples of 2 + 1 stitch).  Try and keep to multiples of 5, or you'll need to change the decreasing rounds as well.  For shorter heads, use fewer rounds between r3 and r25.

Saturday, February 5, 2011

Selling My Stuff

A few months ago, I bought Creepy Cute Crochet by Christen Haden, an awesome book full of zombies and ninjas and robots, oh my!  After making a number of the patterns from the book, I had a play with making individualised goth and emo vampires for my friends for xmas and birthday presents.


These went down so well, and I had so much fun making them, that I decided that I'd make a bunch more and sell them on Etsy.  


I've made a handful so far, these just being three, my favourites being the guy with the mohawk, and the one with the pigtails.  My Etsy user name is DontLickTheSpoon, and I've put a bunch of these little guys in my store already.  Hopefully in the future I'll also put up other things, I'll see how I go...

Friday, January 14, 2011

Colourful Chicken, Quinoa, Amaranth and Rice Risotto

After a visit to the organics store to stock up on flour, I bought a bunch of different coloured quinoa and some amaranth to have a play with.  While I've used quinoa before, I'd never had amaranth, but I figured it'd be similar enough that I could figure something out (I also discovered that you can pop amaranth like popcorn!).  My first experiment was to make up a mix of equal parts red, black and white quinoa and amaranth.  It's very pretty.


I used this mix to make a risotto that was half quinoa, half rice and very colourful.


Colourful Chicken, Quinoa, Amaranth and Rice Risotto


200 g Chicken thigh, cut into chunks
1/2 cup arborio rice
1/2 cup quinoa/amaranth mix
2 1/2 cups chicken stock
~ 1 Tsp dried rosemary
~ 1 tsp dried parsley
a sprinkle of chilli or pepper to taste
1 flat brown mushroom, diced
~1/4 of a yellow capsicum, sliced
1 tomato, diced
generous handful of fresh spinach leaves


  • In a medium saucepan, cook chicken in oil until cooked
  • Add rice and quinoa and cook until rice begins to stick
  • Add half a cup of stock, herbs, chilli and mushroom and cook with stirring until all liquid is absorbed
  • Add stock in 1/2 cup lots, allowing to absorb and stirring frequently
  • Add capsicum and tomato with last lot of stock to allow to warm through
  • Add spinach leaves at the end and stir through

This recipe is even more delicious if a cup of cheese is added with the spinach, or maybe some garlic added with the rice, or a few rashers of bacon with the chicken.  The possibilities for adaptation are only limited by what you have in the house, or what you are able to eat.

Tuesday, January 11, 2011

Stripey Yellow and Black Sleeves/Armwarmers (Crochet)

As I mentioned in my last post, for Halloween last year I made a hat and sleeve set for my Bee Girl costume.  The last post had the hat patten, now here's the pattern for the sleeves.


Sleeve Pattern


Pattern uses:
5.5 mm crochet hook
~100 g 8 ply yellow wool
~100 g 8 ply black wool

In yellow wool:
r1    ch4, 24 foundation dc, join with a sc in 3rd ch (24 dc)
r2    sc over the top of the joining sc, ch2, dc in the spaces between dc around, join with a sc in 2nd ch
r3    change colour by incorporating the black thread in the last loop of the joining sc (don't cut yellow), sc over top of join, ch2, dc in spaces, join with a sc
r4    repeat r2


Repeat rows 3 and 4 alternating yellow and black until have 12 stripes (6 yellow, 6 black).  In order to keep the seam straight, it'll be necessary to join the occasional rows with a sl st, sl st in the space between the ch2 and first dc, sc over the top of the sl st.  This puts the join on the opposite side of the ch2, which makes the join line reasonably straight. I did this about every 5th row.


r25  change to yellow. Sc over top of join, dc around, add an extra dc into same space as first sc, ch2. (25 sc)
r26  repeat r2
r27  repeat r3
r28  sc over top of join, dc around, add an extra dc into sc space (26 sc)


Repeat rows 27 and 28 four more times until there are 30 stitches.  Add 5 more stripes, ending on yellow.


You can easily adapt this pattern to suit different sized arms by using a different number of stitches and making the increases happen earlier or later.  Also, I have long arms because I'm 175 cm (5' 9"), and the sleeves fit comfortably from the base of my thumb to my elbow.  If you have shorter arms, you'll probably be wanting to take out some of the stripes.  It's all easy to do if you measure it as you go and just start to increase as your arm gets wider.   

Monday, January 10, 2011

Stripey Yellow and Black Hat (Crochet)

For Halloween last year I dressed up as the Bee Girl from the Blind Melon No Rain video clip:


As part of my costume, I crocheted a stripey yellow and black hat and some sleeves to match.  I'll put up the patterns for both, starting with the hat.


Hat Pattern


Pattern uses:
5.5 mm crochet hook
~30 g 8 ply yellow wool
~50 g 8 ply black wool

In black wool:
r1    ch4, 63 foundation dc, join with a sc in 3rd ch (64 dc)
r2    sc over the top of the joining sc, ch2, dc in the spaces between dc around, join with a sc in 2nd ch
r3    change colour by incorporating the yellow thread in the last loop of the joining sc (don't cut black), sc over top of join, ch2,  dc in spaces, join with a sc
r4    repeat r2

Repeat rows 3 and 4 alternating yellow and black until have 8 stripes.  On rows 7 and 11, join with a sl st, sl st in the space between the ch2 and first dc, sc over the top of the sl st.  This puts the join on the opposite side of the ch2, which makes the join line reasonably straight.

r17  repeat r3 (64 dc)
r18  sc over top of join, ch2, dec, 5dc, dec, *6dc, dec* x6, 6dc, join with sc (56 dc)
r19  change to yellow.  Sc over top of join, ch2, dc, dec, 4dc, dec, *5dc, dec* x6, 4dc, join with sc (48 dc)
r20  sc over top of join, ch2, 2dc, dec, 3dc, dec, *4dc, dec* x6, 2dc, join with sc (40 dc)
r21  change to black. sc over top of join, ch2, 3dc, dec, 2dc, dec, *3dc, dec* x5, 4dc, join with sc (32 dc)
r22  ch3, dec starting in the same gap (the two 'feet' of the dec should be on either side of the sc, ch2 from the previous row), *2dc, dec* x7, 2dc, join with sc (24 dc)
r23  change to yellow. sc over top of join, ch2, dec, *dc, dec* x7, join with sc (16 dc)
r24  sc over top of join, ch2,  dec x8, join with sc (9 dc)
r25  change to black.  sc over top of join, ch2, dec x4, join with sc.  Fasten off and stitch tail though tops of stitches to close hole.

I have a reasonably large head (59 cm), and I made the hat to be a bit loose so it would breathe, so bear that in mind when making this pattern.  It should be easy enough to lose a few stitches here and there, or to use a smaller hook - just remember that because of the looseness of the stitch, it's necessary to do two rounds to get an accurate idea of the size.

Friday, January 7, 2011

Cabled Crochet Fingerless Gloves


I made myself a cabled crochet hat following this pattern, and I wanted to make some fingerless gloves to match.  However, there weren't any patterns that I could find even remotely close to what I wanted, so I came up with one myself.  If you get lost in the cabling instructions, the hat pattern has some very good pictures detailing the steps.

Pattern uses:
fpdc, bpdc, fptc
4 mm crochet hook
~100 g 8 ply wool

In all rows, begin on a ch2.  This counts as the first bpdc in the repeated pattern

r1   32 foundation dc.  Join with sl st
r2   *bpdc, fpdc* repeat around x16.  Join
r3   *bpdc, fpdc* repeat around x16.  Join
r4   *bpdc, 2fpdc, bpdc, 4fpdc* repeat around x4.  Join
r5   *bpdc, 2fpdc, bpdc, 4fpdc* repeat around x4.  Join
r6   *bpdc, 2fpdc, bpdc, fptc in 3rd fpdc, fptc in 4th fpdc, fptc in 1st fpdt, fptc in 2nd fpdc* repeat around x4.  Join
In r7, it's important that you crochet into the fptc in the same order that you crocheted them.
r7   *bpdc, 2fpdc, bpdc, 4fpdc* repeat around x4.  Join

Repeat rows 5-7 until work reaches the desired length between knuckles and thumb.  Stop on any row.

sl st across top of 1st fpdc ch2, fpdc on next stitch and repeat cabling pattern until get to beginning ch2 from previous round.  Bpdc in that ch2, fpdc in same fpdc as sl st from start of round, dc in gap before ch2.  Fasten off. **Reattach yarn into top of first fpdc, ch2, fpdc in same stitch, repeat pattern around ending with a fpdc in the final dc, fasten off** Repeat between **  ** the appropriate amount of times until work reaches the base of your thumb just above your wrist.

Return to repeating rows 5-7.  On the first row after finishing the thumb hole, join the extra dc/ch2 between the first 2 fpdc together by doing a fpdc across the two of them.  Continue until desired length up the arm is reached.  Finish on row 5.

Repeat rows 2 and 3  six times for a ribbed cuff.  Fasten off, then tuck in ends.  You'll have a bunch of ends from the thumb holes.  I find it best to tuck them down the backs of the two fpdc lines on either side, that way the slight thickening is less noticeable.


Thumb:

Dc around the ch2/dc circle that makes the edge of the thumb hole, starting from the bottom (wrist end) and averaging 1 dc per stitch.  *Don't join, and work a dc dec in every stitch until about halfway up the thumb hole.  Dc until the top (finger end) of the hole, then work a single dec at the corner.  Continue dc until halfway down the hole, then dec every stitch back to the start of the round*.  Work * * to make a third row, sl st then fasten off and tuck in ends.

The pattern can be adjusted for smaller or larger hands by extending the 8 stitch motif to 10 stitches by adding additional bpdc to the two bpdc spaces and using more or less pattern repeats.

Thursday, January 6, 2011

Gluten-Free Carrot Cake or Muffins Recipe


It came as a bit of a surprise when I realised that I've never actually baked a carrot cake before, considering that it's my most favourite cake ever.  I spent a bunch of time trying to find a recipe that didn't have nuts or dried fruit, as I'm on a low FODMAP diet so dried fruit is not allowed, and currently not eating nuts as they're a potential migraine trigger.  Also, I don't like walnuts.  But after half an hour of searching, I kept finding recipes contaminated with sultanas and nuts, or worse still, coconut and pineapple (not a dietary issue, just a grossness thing).  So I decided to try my hand at adapting one to my needs.  I started from this one, as it looked the most tasty and I had all the other ingredients in the cupboard.   Conveniently, it's also dairy-free, as most carrot cakes tend to be.

Also, I was given a bug-shaped muffin tray for Christmas which I was itching to try and this recipe seemed a good one to try given the large egg content for extra gluey-ness.  I also added extra guar gum in the hopes that the cake would stick to itself, rather than the tray or crumble everywhere.


Carrot Cake

2 cups gf flour mix*
1 tsp mixed spice
1/2 tsp cinnamon
1/2 tsp ginger
1/2 tsp baking soda
1/2 cup castor sugar
1/2 cup brown sugar
3 eggs, lightly beaten
1 cup oil
1 tsp vanilla
2 cups grated carrot


  • Preheat oven to 180°C.  Grease a 20 cm round baking tin
  • Sift flour, spices and soda together.  Make sure they're well mixed
  • Add all the remaining ingredients and stir until just combined
  • Cook for 55-60 min (Or if making muffins 20-25 min)

* I make my own flour mix from 2 parts rice flour, 1 part corn flour and 1 part tapioca flour.  I also add 1/2-1 tsp guar gum per cup of flour.  For this particular recipe I added 2 tsp due to the muffin tray.
Other flour mixes should be fine, just make sure they have guar or xanthan gum in them.

Ice with cream cheese icing:


Cream Cheese Icing

250 g cream cheese, softened
3 Tsp butter, softened
1 tsp vanilla
1 Tsp lemon juice
2 cups icing sugar

  • Beat cream cheese, butter, vanilla and lemon together until smooth
  • Add icing sugar and mix

As you can see from the picture, the muffin tray was a success!  They slid right out with no casualties, and were delicious.

First Post!

I like to crochet.  And I like to bake.  And while for the most part, I can find recipes that suit my needs for both of my habits, I also have a compulsive urge to adapt things.  I've been thinking about actually writing down some of my adaptations and originals for a while now, and it looks like I'm finally making a start.  So I'm going to write things down as I get around to it, and see how it goes....