Tuesday, January 22, 2013

T.A.R.D.I.S. - Inspired Hat Pattern

Before I started making my Dalek hat, I had actually started making a T.A.R.D.I.S. hat to go with my T.A.R.D.I.S. gloves.  I had decided on the design - I wanted something to represent the T.A.R.D.I.S. that still worked well as a hat.  There are a number of designs that do a good job of looking like the T.A.R.D.I.S., but are very square on top and/or have the light bulb, so aren't my idea of everyday attire!  
So I took the most distinctive elements - the windows and the colour, and put them together into a normal-ish hat.  After running out of wool, and then getting side-tracked with SO MANY projects for christmas, I finally got to finish my idea:


It's very similar to the gloves - the window panels and the bottom cuff are the same.  The pattern is available both at my etsy store, or on Ravelry.  The pattern is of intermediate difficulty, and is for a medium men/large women's sized hat, with instructions to make smaller and larger sizes.  I also have an already one on etsy, and am happy to do custom orders

Thursday, January 17, 2013

Molecular Tea Cosy Pattern

A while ago now, I made a tea cosy which had a number of the molecules in tea embroidered on it.  I've been meaning to write up the pattern for a long time, but things just keep getting in the way.  But I finally managed to find some time (most of it was written during talks at a Chemistry conference), so here it is!

I made this for the tea pot that my boyfriend mostly uses, and I thought that he'd be much more likely to use it if I made it so he didn't have to keep taking the cosy off every time he made tea.  So I designed it with a flap over the lid, which is buttoned down.  It also gave me extra space to embroider, which was a nice bonus.


Pattern

The pattern is written so that it can be adapted to any tea pot, rather than specifically for the one I made it for (which was a bit of an odd one any way).  This does require that you do some measuring and basic maths, but don't let that put you off! 

Things You Need

  • Measuring Tape
  • 2 Buttons 
  • 2 Crochet hooks - 2 mm and 5.5 mm
  • 4 ply yarn in red, blue, while and black
  • 8 ply yarn in light blue (or other base colour)


Stitches

The tea cosy is worked in herringbone stitch (hb), which is a variation of dc.

hb - herringbone stitch. yo, insert hook into stitch, yo and draw through stitch and the first loop on the hook at the same time, yo, draw through one loop, yo, draw through both loops on the hook. (This is just a hb work in the front loops of two st at the same time).

hbdec - herringbone decrease.  If the right side of the work is facing towards you, yo, insert hook into the front loops of the next two stitches, yo and draw through stitches and the first loop on the hook at the same time, yo, draw through one loop, yo, draw through both loops on the hook. (This is just a hb worked in the front loops of two st at the same time).  

If the wrong side of the work is facing towards you, repeat the above, but instead of the front loops, use the back loops of the next two st - yo, insert hook into the back loops of the next two stitches, yo and draw through stitches and the first loop on the hook at the same time, yo, draw through one loop, yo, draw through both loops on the hook. (This is just a hb worked in the back loops of two st at the same time).

Alternatively, just do a standard dc dec.

Clean fasten off - Fasten off as usual, but leave slightly longer tail.  Thread the yarn onto a needle.  Going from front to back, insert the needle into first stitch of the round (where you would normally put a crochet hook - under the top loops) and pull it through.  Now put the needle back through the top of the last stitch of the round and pull tight.  This will be the same place where the thread comes out of, so you will have made a loop that comes out, goes through the first stitch then comes back to the same place (It should look a lot like the loop of a crochet stitch). 

Cosy

  • Make a gauge square - it's important to do this to get the sizing info for your measuring/calculating.  Also, the foundation row is a lot looser than the main stitch, so a few rows are needed to get it to the right tension.

Gauge square row 1:  12 foundation sc.
Gauge square row 2:  ch 3 (counts as hb), turn, 11 hb.
  • Repeat row 2 for about 4-5 rows until the piece is no longer getting narrower.  Measure the middle 10 st of one of the top rows to get the gauge (e.g. 5 cm (2 in) for 10 st).
  • Measure the tea pot at the widest horizontal point between the spout and handle (e.g. 15.5 cm). Only measure along the body, until you hit the spout and the line for the handle (you probably won't actually hit the handle as it will be sticking out).  From your gauge, calculate how many st fit into this length. (e.g. length is 15.5 cm, gauge is 5 cm for 10 st.  15.5 cm/5 cm x 10 st = 31 st needed.)

Cosy row 1:  foundation sc the number of st you calculated (e.g. 31 st).
Cosy row 2:  ch 3 (counts as first st), turn, hb st in each st to end of row (e.g. 31 hb).
  • Repeat row 2 until piece measures from the ground to the top of the spout (if that is shorter than the handle). Tie off.
  • Make a second piece the same size, but don't tie off
  • ch3 (counts as first st), turn. Put both pieces side-by-side (making sure that the stitches are facing the same way). Work the next row of hb st across the top of both pieces (e.g. 62 hb).
  • Continue to work across both pieces until the length of the piece reaches the top of the handle.  Join with a st st in the beginning ch. From now on, you will be working in the round.  Begin each row with a ch 3 and turn, end with a st st join in 3rd ch.
  • The piece will now have two flaps, a short slit for the spout and a longer one for the handle.


Decrease

  • Measure around the hole in the top of the pot, and work out how many stitches this represents. (e.g. distance around is 15 cm.  15 cm/5 cm x 10 st = 30 st) You will need to end up with this many stitches, so work out how many you will have to decrease (62 - 30 = 32 st to decrease).
  • Next measure the distance from the top of the handle to the hole (e.g. 5 cm).  Now measure how many rows fit into this distance (e.g. 4 rows).  This is the number of rows you have to do the decreases in.
  • Now work out how many stitches to decrease per row.  Divide the number of stitches by the number of rows (e.g. 32/4 = 8 stitches to dec per row)
  • Spread the dec out evenly across each row.  For example, for the 62 st:
row 1:  ch3 (counts as first st), turn. 4 hb, hbdec, *6hb, hbdec* x3, 5hb, hbdec, *6hb, hbdec* x3, join with a st st (54 hb).
row 2:  ch3 (counts as first st), turn. 3 hb, hbdec, *5hb, hbdec* x3, 4hb, hbdec, *5hb, hbdec* x3, join with a st st (46 hb).
row 3:  ch3 (counts as first st), turn. 2 hb, hbdec, *4hb, hbdec* x3, 3hb, hbdec, *4hb, hbdec* x3, join with a st st (38 hb).
row 4:  ch3(counts as first st), turn.  hb, hbdec, *3hb, hbdec* x3, 2hb, hbdec, *3hb, hbdec* x3, join with a st st (30 hb).
  • Fasten off

Top Flap

Note: The tea pot I was using had an unusually low lid, so I'm not sure how this will look for other pots. Adjust it as needed until you like the look of it.
  • Measure the distance over the top of the lid from one side of the top hole to the other.  Work out how many stitches this is (e.g. distance across is 9 cm.  9 cm/5 cm x 10 st = 18 st).
  • In the last row, find the centre point of one of the sides (which would be in between the spout and the handle, about 1/4 of the stitches around from the end of the row).  This will be where the middle of the top flap is, so count out half the number of stitches to each side of this point (e.g. 9 st to each side for a total of 18 st).
row 1:  making sure that the stitches are going the right way relative to the last row, attach yarn, ch 3 (counts as first st) and work the appropriate number of hb st (e.g. 18 hb).
row 2: ch3 (counts as first st), turn, hb to the end (e.g. 18 hb).
  • Keep working row 2 until the piece covers the top of the pot and reaches the point where you want to place the buttons on the other side. 
  • ch3 (counts as first st), turn. Work a few hb in from the side, depending on where you want the buttons.  Work ch st until you have a hole large enough for your button to fit through, skipping 1 hb for each ch you work.  Work hb until you get to the point on the other side where the other button hole will be placed (making the work symmetrical).  Repeat the same number of ch and hb as for the other button hole. (e.g. ch 3, turn, 2 hb, ch3 (skipping 3 hb), 6 hb, ch3 (skipping 3 hb), 3 hb. (12 hb, 6 ch, 18 st total)
  • ch3 (counts as first st), turn.  Work hb across, working 1 hb per ch (I just do them in the ch space, rather than the actual chain because it's easier).
  • Continue working row 2 until the flap has the desired length.
  • ch1, sc around the edges of the flap and the rest of the hole.  Make sure that the right side of the work is towards you.  If not, turn at the start of this row so that it is.  Fasten off.


Sewing Up

  • Sew up the two side slits to the bottoms of the handle and the spout respectively.
  • sc around the edges of the two holes that are made by doing so.
  • Attach the buttons so that they fit in holes made for them in the top flap.

Molecule Embroidery


Gallic acid


Hesperetin (a flavanone)


Caffeine (awesome)

 
Quercetin (also a flavanone)

 
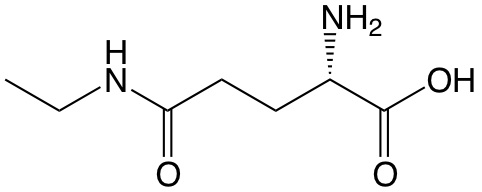
Theanine (an amino acid)


  • Embroider the lines of the structures in black thread (I used 4 ply wool, but I recommend using something thicker)
  • Make the appropriate number of nitrogen, oxygen and hydrogen circles:

Oxygens and Nitrogens

row 1:  6 sc in a magic circle, join with a st st in first sc (6 sc).
row 2:  2 sc in each st, clean fasten off, leaving a long tail for sewing (12 sc). 


Hydrogens

row 1:  6 sc in a magic circle, clean fasten off, leaving a long tail for sewing (6 sc).

  • Place where indicated by the diagrams
  • Fill in empty spaces with water (H2O) molecules
For extra chemistry nerd points:
  • In 3D, the angles between NH and OH and the rest of the molecule are 109.7°, but are usually drawn as 120° in 2D, so try and sew them as something close to this (basically don't make them 180°!)
  • When putting in the water molecules, I was a super geek and factored in hydrogen bonding.  This meant that when next to an oxygen or a nitrogen, I had a hydrogen of the water pointing towards it, and when next to a hydrogen, I had the oxygen pointing towards it and the hydrogens pointing away.  


Monday, October 1, 2012

Dalek-Inspired Hat Pattern

It's been a nearly a year since I first made my dalek gloves, so I thought I'd have a try making a matching hat.


There are several versions of hats that look like the top of the dome of the dalek, so I thought that making another one of those would be a bit redundant.  It's also really hard to make a version that has the bobbles at the bottom due to the need to taper the hat at the top.  Instead, I opted for a more abstract design where the bobbles and the stripes are side-by-side.  I think this makes for a more subtle design that still has the elements of a dalek in it.


Unfortunately, making the pattern of alternating squares requires a number of strands of wool to be in use at a time.  It also means that there will be a LOT of ends to tuck in when you're done.  The pattern can be worked with just two strands, but it leaves the back a lot uglier, and you have to be really careful with tension.

The pattern is available both at my etsy store, or on Ravelry.  The pattern is of intermediate difficulty, and is for a large women's/medium men's sized hat, with instructions to make smaller and larger sizes.  I also have a couple of already made pairs on etsy, and am happy to do custom orders

Friday, July 20, 2012

T.A.R.D.I.S. - Inspired Fingerless Gloves

After making the Dalek gloves, it was only a matter of time before I got the urge to make a pair of matching T.A.R.D.I.S. gloves.  After several false starts (making horizontal lines that stand out in crochet is quite difficult!), I ended up with something I'm happy with.  I couldn't decide whether to make them with the sign on the door or not, so I made both.  I like the look of the pair with out best, but the ones with the sign appeal to my sense of accuracy.


The pattern is available both at my etsy store, or on Ravelry.  The pattern is of intermediate difficulty, and is for medium/large women's sized gloves, with instructions to make smaller and larger sizes.  I also have a couple of already made pairs on etsy, and am happy to do custom orders

Sunday, June 17, 2012

Gluten-Free Dalek Smash Cake and Lemon Sour Cream Cake Recipe

My partner and I have our birthdays two days apart, so the last couple of years we've had a joint costume party.  Last years theme was video games, and I spent weeks making decorations, about half of which are still up a year later.

If I remember rightly, the guitar hero song was Sweet Child of Mine, on the basis that it always has to be played ad nauseum at parties, but I didn't want to actually listen to it at mine.

(I was dressed up as Toadette.)

This years party was movie-themed, and I dressed up as Sara from the labyrinth.  I made the waistcoat by getting a plain white vest, stenciling on the pattern in pencil then painting over it.


My favourite part of the night was the cake.  It took me three days to make (mostly because I was organised and made it in stages), but ended up amazing.  It was a Dalek smash cake, which I made following the instructions here (I know that Doctor Who is technically not movie themed - though the eighth Doctor was in a movie.  The cake is just too awesome to care!).


If you don't know what a smash cake is, basically the top half of the cake is a hollow chocolate dome that is supposed to be smashed open before eating the cake:


Inside there were the brains of the Dalek.  Delicious, gummy brains!  Plus, the entire cake (which was lemon sour cream) as well as the 'plunger' and the eye were gluten-free!  It would be just as easy to make it dairy-free as well by using dark chocolate, the right sort of cookie and making an appropriate cake.  My Dalek is a bit on the short side compared to the one in the tutorial, but that has more to do with the fact that I had to use a rectangular pan rather than a square pan for the base so did not have a lot of mix to give it height, rather than it being flat because it's gluten-free.

Because he was so short, I couldn't use chocolate buttons as the Dalek bumps.  Instead, I just piped them using chocolate icing.  I also didn't use liquorish for the black bits.  Liquorish contains wheat, plus it's gross.  I added black food colouring to the chocolate icing and piped that on as well.

I found the recipe for the cake somewhere online a few years ago, but I can't seem to find it again so I thought I'd post it here as it's a really good one.  To make the Dalek, I made a double batch.

GF Lemon Sour Cream Cake

Ingredients


2 eggs
3/4 cup sugar
1/2 cup (125 g) sour cream
1 1/2 tsp vanilla essence
zest of 1+ lemon
1/4 cup lemon juice
1/4 cup melted butter
1 1/2 cup gf flour - 2 parts rice, 1 part corn, 1 part tapioca
2 tsp baking powder
1 tsp xantham/guar gum
1/2 tsp salt

  • Whisk eggs and sugar together until it gets stiff and forms ribbons
  • Add sour cream, vanilla, zest, juice and butter and mix through
  • Add dry ingredients and mix well
  • Bake at 180°C for 30 min for cake, or 15-20 min for cupcakes

Icing

1 cup icing sugar
Juice of 1/2 a lemon
~2 tsp oil
Food colouring
boiling water

  • Mix icing sugar, lemon juice, oil and food colouring together
  • Add boiling water slowly until icing is reasonably thick

This cake is also really good with cream cheese icing (Definitely my favourite icing)

250 g cream cheese
3 Tsp butter
1 tsp vanilla essence
1 Tsp lemon juice
2 cups icing sugar

  • Mix cream cheese, butter, vanilla and lemon juice together until smooth
  • Add icing sugar and mix well


Tuesday, May 1, 2012

Pinwheel Stripes Fingerless Gloves

I made these gloves (and a matching hat) for my little sister's 13th birthday present.  They're quick and easy to make - not counting a couple of false starts, it took me two evenings to make them.


Gloves

The pattern is worked in a series of cluster stitches:

Stitches

9 st cluster:  *yarn over, insert hook in next stitch, yarn over, draw yarn through the stitch, draw through first 2 loops on hook*, repeat * * 8 more times (10 loops on hook).  Yarn over, draw through all 10 loops, ch1.

5 st cluster: *yarn over, insert hook in next stitch, yarn over, draw yarn through the stitch, draw through first 2 loops on hook*, repeat * * 4 more times (6 loops on hook).  Yarn over, draw through all 6 loops, ch1.


4 st cluster: *yarn over, insert hook in next stitch, yarn over, draw yarn through the stitch, draw through first 2 loops on hook*, repeat * * 3 more times (5 loops on hook).  Yarn over, draw through all 5 loops, ch1.


If unfamiliar with making cluster stitches (which is basically like making a series of half-finished dc,  drawing a loop through them to join them together and closing with a ch st), you can find some good pictorial examples here and here, and a video here.


Pattern 

Using a 7 mm crochet hook and 8 ply yarn.


r1  33 Foundation sc in black. ch2, turn. (Note: I had to use extra turning crochet so that the edges of the piece did not end up too tight) 

r2  sc,  *skip next 3 st, 9 dc in next st, skip next 3 st, sc*, repeat * * to end. Change to blue. ch2, turn.

r3  4 st cluster, ch3, sc.  *ch3, 9 st cluster, ch3, sc*, repeat * * 2 more times, ch3, 5 st cluster. ch4, turn.

r4  4 dc into central stitch of cluster, sc into sc. *9 dc into central stitch of cluster, sc into sc*, repeat * * 2 more times. 5 dc into central stitch of cluster.  Change to black. ch2, turn

r5  sc in last dc.  *ch3, 9 st cluster, ch3, sc*, repeat * * to end


r6  sc.  *9 dc into central stitch of cluster, sc into sc*, repeat * * to end.  Change to blue.  ch2, turn

r7-13  repeat r3-6.  Tie off, leaving a long tail for sewing.


Sewing up

With wrong sides together, sew the edges of rows 1 and 13 together so that the centres of the clusters match up.  Sew halfway (two clusters), then tie off for the thumb hole.  From the other end, sew down one cluster length and tie off.  Tuck in ends both along the seam and along the edges.

As you will get a slightly different effect depending on whether it is row 2 or row 13 that is on the palm side of the thumb hole, it makes a difference which end of the glove you make the thumb hole on (At least, it does to perfectionists like me!).  Bear that in mind when it comes to sewing up, and you will need to do your sewing from opposite ends to make your gloves true enantiomers!


Edging and Thumb

Turn the piece the right side out. Tie on at the seam and work two lines of sc around both the top and bottom edges of the gloves.  I found that 23 st (5 across each of the half-clusters, 2 at the smaller black parts and 4 at the seam part) made a nice edging that wasn't too tight or too loose.

For the thumb, work 13 sc around the thumb hole starting a the bottom.  Join, ch3, 2 dc dec, 4 dc, 2 dc dec.  Join, ch1, sc around.  Join and tie off.  Tuck in ends

Pinwheel Stripes Hat

A few months ago I made a pair of gloves for a colleague to replace one she had lost.  I was left with a couple of half-used balls of a super soft merino wool, which I used to make this hat (which is available at my etsy store).  I also made a version with larger squares in blue and black for my little sister's 13th birthday (along with a pair of matching gloves).  Instructions for both are given below.


Hat

The main pattern below is for the purple and pink hat, which has smaller squares and more stripes.  The pattern in square brackets is for the blue and black hat.  The pattern is worked in a series of cluster stitches:

Stitches

9 st cluster:  *yarn over, insert hook in next stitch, yarn over, draw yarn through the stitch, draw through first 2 loops on hook*, repeat * * 8 more times (10 loops on hook).  Yarn over, draw through all 10 loops, ch1.

5 st cluster: *yarn over, insert hook in next stitch, yarn over, draw yarn through the stitch, draw through first 2 loops on hook*, repeat * * 4 more times (6 loops on hook).  Yarn over, draw through all 6 loops, ch1.

4 st cluster: *yarn over, insert hook in next stitch, yarn over, draw yarn through the stitch, draw through first 2 loops on hook*, repeat * * 3 more times (5 loops on hook).  Yarn over, draw through all 5 loops, ch1.

cluster dec: 4 dc into centre of next cluster, tr into sc, 4 dc into centre of next cluster.

If unfamiliar with making cluster stitches (which is basically like making a series of half-finished dc,  drawing a loop through them to join them together and closing with a ch st), you can find some good pictorial examples here and here, and a video here.


Pattern 

Using a 5.5 [7] mm crochet hook and 8 ply yarn.

r1  119 [95] Foundation sc in purple [black], sl st to join bottom of last stitch with the bottom of the first stitch to close the ring, sc, join at top of first st. ch1, don't turn

r2  sc,  *skip next 3 st, 9 dc in next st, skip next 3 st, sc*, repeat * * to end. Change to dark pink [blue]. Join with a sl st, ch2, turn. 15 [12] clusters 


r3  4 st cluster, ch3, sc.  *ch3, 9 st cluster, ch3, sc*, repeat * * 13 [10] more times, ch3, 5 st cluster. Join with a sl st, ch3, turn.  15 [12] clusters

r4  4 dc into central stitch of cluster, sc into sc. *9 dc into central stitch of cluster, sc into sc*, repeat * * 13 [10] more times. 5 dc into central stitch of joining cluster.  Change to light pink [black]. Join with a sl st, ch1, turn.  15 [12] clusters

r5  sc in last dc.  *ch3, 9 st cluster, ch3, sc*, repeat * * to end.  Join with a sl st, ch1, turn.  15 [12] clusters 

r6  sc.  *9 dc into central stitch of cluster, sc into sc*, repeat * * to end.  Change to white [blue].  
Join with a sl st, ch2, turn.  15 [12] clusters

r7  4 st cluster, ch3, sc.  *ch3, 9 st cluster, ch3, sc*, repeat * * 13 [10] more times, ch3, 5 st cluster. Join with a sl st, ch3, turn.  15 [12] clusters

r8  4 dc into central stitch of cluster, sc into sc. *9 dc into central stitch of cluster, sc into sc*, repeat * * 13 [10] more times. 5 dc into central stitch of joining cluster.  Change to purple [black]. Join with a sl st, ch1, turn.  15 [12] clusters


Decreasing

 These instructions are for the pink and purple hat only.

r9  sc in last dc.  *ch3, 9 st cluster, ch3, sc*, repeat * * to end.  Join with a sl st, ch1, turn.  15 clusters

r10  sc.  *9 dc into central stitch of cluster, sc into sc*, repeat * * 4 more times, cluster dec, sc. *9 dc into central stitch of cluster, sc into sc*, repeat * * 4 more times, cluster dec, sc. Change to dark pink.  
Join with a sl st, ch2, turn.  12 clusters


r11  4 st cluster, ch3, sc.  *ch3, 9 st cluster, ch3, sc*, repeat * * 10 more times, ch3, 5 st cluster. Join with a sl st, ch3, turn.  12 clusters
r12  4 dc into central stitch of cluster, sc into sc. *9 dc into central stitch of cluster, sc into sc, 
 cluster dec, sc into sc, 9 dc into central stitch of cluster, sc into sc*, repeat * *. 9 dc into central stitch of cluster, sc into sc, cluster dec, 5 dc into central stitch of joining cluster. Change to light pink. Join with a sl st, ch1, turn. 9 clusters

r13  sc in last dc.  *ch3, 9 st cluster, ch3, sc*, repeat * * to end.  Join with a sl st, ch1, turn.  9 clusters

r14  *sc into sc, 9 dc into central stitch of cluster, sc into sc, cluster dec*, repeat * * 2 more times. Change to white. Join with a sl st, ch2, turn.  6 clusters

r15  4 st cluster, ch3, sc.  *ch3, 9 st cluster, ch3, sc*, repeat * * 4 more times, ch3, 5 st cluster. Join with a sl st, ch3, turn.  6 clusters

r16 4 dc into central stich of cluster, sc into sc, cluster dec, sc into sc, 9 dc into central stitch of cluster, sc into sc, cluster dec, 5 dc into central stitch of joining cluster.  Change to purple. Join with a sl st, ch1, turn.  4 clusters

r17  sc in last dc.  *ch3, 9 st cluster, ch3, sc*, repeat * * to end.  Join with a sl st, ch1, turn.  4 clusters

r18  *sc into sc, cluster dec*, repeat.  Join with a sl st. 2 clusters.  Tie off, leaving a long tail.  Thread the tail of yarn through the top loops of all of the stitches of the last row.  Pull tight to close the hole.  Tuck in threads from colour changes.


 These instructions are for the blue and black hat only.

r9  sc in last dc.  *ch3, 9 st cluster, ch3, sc*, repeat * * to end.  Join with a sl st, ch1, turn.  [12] clusters

r10  *sc into sc, 9 dc into central stitch of cluster, sc into sc, 9 dc into central stitch of cluster, sc into sc, cluster dec*, repeat * * [2] more times.  Change to [blue].  Join with a sl st, ch2, turn. [9] clusters

r11  4 st cluster, ch3, sc.  *ch3, 9 st cluster, ch3, sc*, repeat * * [7] more times, ch3, 5 st cluster. Join with a sl st, ch3, turn.  [9] clusters

r12  4 dc into central stitch of cluster, sc into sc. *cluster dec, sc into sc, 9 dc into central stitch of cluster, sc into sc*, repeat * *.  cluster dec, 5 dc into central stitch of joining cluster.  Change to [black]. Join with a sl st, ch1, turn.  [6] clusters

r13  sc in last dc.  *ch3, 9 st cluster, ch3, sc*, repeat * * to end.  Join with a sl st, ch1, turn.  [6] clusters

r14  *sc into sc, 9 dc into central stitch of cluster, sc into sc, cluster dec*, repeat * *. Change to [blue]. Join with a sl st, ch2, turn. [4] clusters

r15  4 st cluster, ch3, sc.  *ch3, 9 st cluster, ch3, sc*, repeat * * [2] more times, ch3, 5 st cluster. Join with a sl st, ch3, turn.  [2] clusters

r16  4 dc into central stitch of cluster, sc into sc, cluster dec, sc into sc, 4 dc into central stitch of next cluster, tr in sc.  Join with a sl st.  [2] clusters.  Tie off, leaving a long tail.  Thread the tail of yarn through the top loops of all of the stitches of the last row.  Pull tight to close the hole.  Tuck in threads from colour changes.Tie off, leaving a long tail.  Thread the tail of yarn through the top loops of all of the stitches of the last row.  Pull tight to close the hole.  Tuck in threads from colour changes.